EmueraBA
Introduction

EmueraBA launcher is modified from the EmueraEE+EM launcher, currently built using the .NET Framework 4.8 platform.
The default title of the launcher has been changed to EmueraBA, and the default icon of the launcher has been changed.
The graphics library has been replaced with SkiaSharp. All functions related to screen display and image drawing have been completely switched to SkiaSharp, and the 描画インターフェース (graphics drawing interface) configuration item has been removed.
Please refer to the Usage Examples section in GETRESOURCEEXT for information on supported image formats.
Supports reading and playing GIF and WEBP animated images. Simply define them in the resources resource files like static images, then print and display them in ERB scripts in the same way.
You can use the SETANIMETIMER command to refresh the screen for smooth playback.
Automatic character range recognition has been implemented. It can correctly recognize Chinese, Japanese, Korean, English, and Emoji characters and calculate their lengths. The 内部で使用する東アジア言語 (internally used East Asian languages) configuration item has been removed.
Added a new タブ文字幅 (tab character width) configuration item in the Display Settings interface. This configuration item adjusts the character length of tab characters (\t) in text, with a default value of 8.
Tab characters automatically adjust their own character length based on the character length of preceding text. For example, if there is text 111 before the tab character, the current tab character will occupy 5 character lengths.
Added user-defined variable keyword RESIZE. This keyword is used to mark variables that need to have their array size reset. For more information on using this keyword, please refer to ARRAYRESIZE.
Supports screenshot functionality. You can save the current screen as a file through the Help → Screenshot Button in the menu bar, or obtain the current screen's image data through the newly added GSNAPSHOT command.
The resources folder supports reading font files. Simply place font files directly as in the font folder.
The length of the RANDDATA array is no longer limited and can be modified in the csv/VariableSize.CSV file.
Mod Functionality
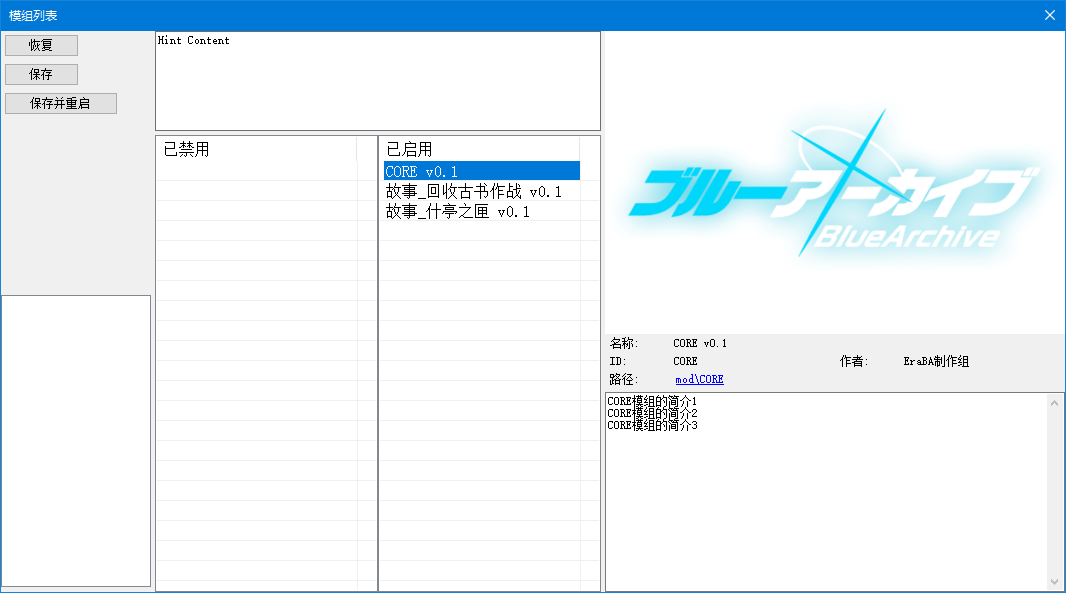
Added a mod reading mechanism and added a Mod List session window in the launcher menu bar, where you can view, enable/disable mods, and adjust mod loading order.
The method for adding mods is as follows:
- Create a new
modfolder in the main game directory. This folder is the mod main directory. - Create a mod folder under the
modfolder. The folder name can be anything, for exampleMyMod. - Create a mod identification file named
_mod.csvin theMyModfolder, and fill in the content according to the attributes in the table below:
| Attribute | Description |
|---|---|
| ID | The unique identifier for this mod. If this identifier is empty or duplicates another mod's name, the mod will not be recognized. Ensure the ID name follows function naming conventions, and it is not recommended to modify it after creation. |
| Name | The display name of this mod. |
| Authors | The author name(s) of this mod. |
| Cover | The display cover for this mod. To read images within the mod, you can fill in {0} as the mod path, for example {0}resources/cover.png |
| Description | The display description of this mod, which can continue on multiple lines. Ensure the Description attribute is written after other attributes. |
ID,MyMod
Name,My mod v1.0
Authors,Tom & Jerry
Cover,{0}resources/cover.png
Description,My mod's description
My mod's description1
My mod's description2
Next, you can add the following resource files in the mod folder:
- Create a
csvfolder to add preset files:.csvChara*.csvVarExt*.csv. - Create an
erbfolder to add script files:.erb.erh.erd. - Create a
resourcesfolder to add the following resources:- Image resources:
.csv.png.jpg, etc. Please refer to theUsage Examplessection inGETRESOURCEEXTfor information on supported image formats. - Audio resources:
.csv.ogg.m4a, etc. Please refer to theUsage Examplessection inGETRESOURCEEXTfor information on supported audio formats. - Spine resources:
.csv.atlas.skel.json. - Font resources:
.ttf.otf. - Plugin resources:
.csv.dll.
- Image resources:
- Create a
textfolder to add multilingual resources:.json. - Create a
fontfolder to add font resources:.ttf.otf.
Files within mods are no different from files in the main game directory. File names are not restricted, but you need to be aware of content duplication issues between mods:
- Preset files:
.csvChara*.csvVarExt*.csv- In case of any content duplication, within the same mod, the first content will be selected with a warning. Between different mods, the content from the later mod will be selected with a warning.
- Script files:
.erb.erh.erd- In case of any content duplication, within the same mod, the first content will be selected with a warning. Between different mods, the content from the later mod will be selected with a warning.
- Image resources, Audio resources, Spine resources
- In case of duplicate resource names, within the same mod, the first content will be selected with a warning. Between different mods, the content from the later mod will be selected.
- Font resources
- In case of duplicate font formal names, within the same mod, the first content will be selected. Between different mods, the content from the later mod will be selected.
- Multilingual resources
- In case of completely identical key name paths, within the same mod, the last content will be selected. Between different mods, the content from the later mod will be selected.
- Plugin resources
- In case of duplicate extension method names, within the same mod, the first content will be selected with a warning. Between different mods, the content from the later mod will be selected.
Multilingual Functionality
The multilingual functionality allows creators to organize text in the game for localization translation. During game runtime, the launcher will automatically integrate available and prioritized language content to quickly display multilingual text.
The method for adding multilingual text is as follows. We will use adding Simplified Chinese language as an example:
- Create a new
textfolder in the main game directory. This folder is the multilingual main directory. - Create a regional language folder under the
textfolder. The folder name should refer to theLanguage tagin theLocale Languagesdocumentation.- By querying the above documentation, you can find that the regional name for
Chinese (Simplified)iszh-CN, which will be used as the folder name. - Folder names are not case-sensitive and do not distinguish between
underscore(_)andhyphen(-), but it is recommended to uniformly use uppercase andunderscore(_), for exampleZH_CN.
- By querying the above documentation, you can find that the regional name for
- Create any
jsonformat file in theZH_CNfolder, and fill in the following example content:
{
  //This is a comment.

  "键名": "内容",
  "START_GAME": "开始游戏",
  "ITEM": "物品",
  "ITEM":
  {
    "APPLE":
    {
      "NAME": "苹果",
      "DESC": "一种水果",
    },
    //Note: Avoid having line breaks (\n) in key names, for example BA\nNANA is not a compliant key name because the launcher uses this character when integrating language content.
    "BANANA":
    {
      "NAME": "香蕉",
      "DESC":
      [
        "大香蕉,一条大香蕉",
        "你的感觉真的很奇妙",
      ],
    },
  },
}
At this point, we have successfully added multilingual text for Simplified Chinese. Next, we need to enable this language in the settings:
- Open the launcher and enter the
Mod List. You can see that theMultilingual Listin the lower left corner of the window has an additionalChineseoption. Double-click to enable this option and click theSavebutton.- If you have added multiple different languages, you can use the mouse to drag enabled languages to adjust the display order, with the top of the list having the highest priority.
- Additionally, in the
Mod List, if there are duplicate key name paths between mods, the text content from the later mod will be prioritized. - After each modification to the
Multilingual List, you must restart the program to reset the language text cache and reset all code that has been refactored into constant strings.
Finally, use the TEXT and TEXTLIST commands in the code to obtain multilingual text. When calling, simply input the key name according to the key name path you set in the json file:
LOCALS '= TEXT("start_game") ; Get the text "开始游��戏", input key names are not case-sensitive
PRINTSL TEXT("ITEM") ; Print "物品"
PRINTSL TEXT("ITEM", "APPLE", "DESC") ; Print "一种水果"
TEXTLIST LOCALS, "ITEM", "APPLE", "DESC"
PRINTSL LOCALS:0 ; Print "一种水果"
TEXTLIST LOCALS, "ITEM", "BANANA", "DESC"
PRINTSL LOCALS:0 ; Print "大香蕉,一条大香蕉"
PRINTSL LOCALS:1 ; Print "你的感觉真的很奇妙"
Audio Functionality
The audio component has been replaced with CSCore, and a new Audio session window has been added to the launcher menu bar, where you can adjust various volumes and functions.

Similar to image resources, you can place audio files in the resources folder, create csv files, and define Audio resources to support more custom audio effects.
; Audio name,Audio file name,Volume(100),Start time(00:00:00),Play duration(Total duration of audio file)
MyMusic,MyMusic.ogg
MyMusic1,MyMusic1.m4a,100
MyMusic2,MyMusic2.wav,80,00:01:30
MyMusic3,MyMusic3.mp3,70,00:01:30,15000
The Start time and Play duration attributes in the csv file accept TimeSpan or ms(milliseconds) values. For the writing format of TimeSpan, please refer to the example section in the TimeSpan.TryParse documentation.
Please refer to the Audio Related commands to learn more about audio functionality.
Please refer to the Usage Examples section in GETRESOURCEEXT for information on supported audio formats.
Spine Animation Functionality
Added support for Spine Runtime, which can read Spine animation files and render the screen through SkiaSharp.
- Currently supports the following versions of Spine runtime:
- 3.8.xx
- 4.2.xx
The method for adding Spine resources is similar to adding image resources. Place Spine resource files in the resources folder and create a csv file, filling in the following content in the csv file:
; Spine resource name,atlas file,skel file or json file
aris_spine, aris.atlas, aris.skel
You can then use commands like SPINECREATE and CBGSETSPINE in the code to load and display Spine animations on the screen.
; Set animation refresh interval in milliseconds
SETANIMETIMER 1000 / 60

; Create a Spine animation to a self-specified ID
SPINECREATE 0, "aris_spine"

; Set the Spine animation's scale to 50%
SPINESETSCALE 0, 50

; Set ANIM for the Spine animation
SPINESETANIM 0, 0, "IDLE_01", 1
SPINESETANIM 0, 1, "00", 1

; Display the specified Spine animation on the screen
CBGSETSPINE 0, 0, 0, 1
Please refer to the SPINE Related commands to learn more about Spine animation functionality.
Plugin Functionality
EmueraBA supports reading external dynamic link library files (*.dll), allowing you to add extension methods and call them in game scripts without modifying the launcher itself, to meet more functional requirements and improve runtime performance.
The process for building plugins is as follows:
- First execute the build process of EmueraBA Launcher to complete the development environment deployment for EmueraBA launcher.
- In the cloned EmueraBA repository, find and open the
Emuera.slnsolution. In Visual Studio's Solution Explorer, find thePluginExampleproject and open thePluginEntry.csfile in the project. - The plugin must contain a public static
PluginEntryclass, which is the initialization entry point for the plugin. - Declare the following content in the
PluginEntryclass to add new functionality to the launcher:- Declare a public static
void RegisterFunctionMethod(Dictionary<string, FunctionMethod> methodList)function to add extension methods.- You can refer to the following files to understand the writing of implementation classes inheriting from
FunctionMethod, to write custom extension methods in thePluginEntry.csfile:- Emuera\GameData\Function\Creator.cs
- Emuera\GameData\Function\Creator.Method.cs series files
- You can refer to the following files to understand the writing of implementation classes inheriting from
- Declare a public static
- Find the solution configuration in the upper left corner of the Visual Studio interface. If the configuration is
Debug, switch it toRelease. - Right-click on the
PluginExampleproject and selectProperties. In theApplicationmenu page, change the default names ofAssembly NameandAssembly Information...to your plugin name. - Right-click on the
PluginExampleproject and selectRebuild. The generated DLL file can be found in thePluginExample\bin\Releasefolder.
The process for adding plugins to the game itself is as follows:
Similar to the method for adding image resources, simply place the generated DLL file in the resources folder and create a csv file, filling in the following content in the csv file.
Note that in the csv file, only include DLL files that contain the PluginEntry class; other accompanying DLL files do not need to be filled in.
; DLL file name
MyPlugin.dll
MyOtherPlugin.dll
New Extended Variable Types
List
The declaration format for lists is #LIST(S) <variable name>
When declaring this variable, it supports simultaneous definition with the GLOBAL, SAVEDATA, CHARADATA, DYNAMIC, and REF keywords.
When defined with the SAVEDATA keyword, the バイナリデータライターのバージョン (binary archive writer version) configuration item needs to be changed to 1809 or above.
Please refer to the List Related commands to learn more about functionality.
#LIST MY_LIST			; Declare a list variable with value type `integer` and name `MY_LIST`

LISTADD MY_LIST, 10		; Add an element with value 10 to MY_LIST
PRINTVL MY_LIST:0		; Print the 0th element of MY_LIST, printing result is "10"
Hash List
The declaration format for hash lists is #HASHLIST(S) <variable name>
When declaring this variable, it supports simultaneous definition with the GLOBAL, SAVEDATA, CHARADATA, DYNAMIC, and REF keywords.
When defined with the SAVEDATA keyword, the バイナリデータライターのバージョン (binary archive writer version) configuration item needs to be changed to 1809 or above.
Please refer to the Hash List Related commands to learn more about functionality.
#HASHLISTS MY_HASHLIST			; Declare a hash list variable with value type `string` and name `MY_HASHLIST`

HASHLISTADD MY_HASHLIST, "TEXT"		; Add an element with value "TEXT" to MY_HASHLIST
PRINTVL HASHLISTHAS(MY_HASHLIST, "TEXT"); Print the lookup result of MY_HASHLIST for value "TEXT", printing result is "1"
Dictionary
The declaration format for dictionaries is #DICT_<I|S><I|S> <variable name>
If the declared key type is integer, it supports using the ERD keyword functionality.
When declaring this variable, it supports simultaneous definition with the CONST, GLOBAL, SAVEDATA, CHARADATA, DYNAMIC, REF, and HARDCHECK keywords.
When defined with the SAVEDATA keyword, the バイナリデータライターのバージョン (binary archive writer version) configuration item needs to be changed to 1809 or above.
Please refer to the Dictionary Related commands to learn more about functionality.
#DICT_IS MY_DICT		; Declare a dictionary variable with key type `integer`, value type `string`, and name `MY_DICT`

MY_DICT:6 '= "TEXT"		; Write an element with key 6 and value "TEXT" to MY_DICT
PRINTSL MY_DICT:6		; Print the value with key 6 in MY_DICT, printing result is "TEXT"
Array-type Dictionary
The declaration format for array-type dictionaries is #DICT(S)_DIM(S) <variable name>(, array length = 1)
If the declared primary key type is integer, it supports using the ERD keyword functionality.
The second-dimensional array subscripts of variables support using the ERD keyword functionality by default.
When declaring this variable, it supports simultaneous definition with the GLOBAL, SAVEDATA, CHARADATA, DYNAMIC, REF, and HARDCHECK keywords.
When defined with the SAVEDATA keyword, the バイナリデータライターのバージョン (binary archive writer version) configuration item needs to be changed to 1809 or above.
Please refer to the Dictionary Collection Related commands to learn more about functionality.
#DICTS_DIM MY_DICTDIM, 10		; Declare an array-type dictionary variable with primary key type `string`, value type `integer`, name `MY_DICTDIM`, and each created array has length `10`

DICTITEMCREATE MY_DICTDIM, "NEW"	; Create an array named "NEW" in MY_DICTDIM
MY_DICTDIM:"NEW":0 = 20			; Assign value 20 to the 0th element of the "NEW" array in MY_DICTDIM
PRINTVL MY_DICTDIM:"NEW":0		; Print the 0th element of the "NEW" array in MY_DICTDIM, printing result is "20"
List-type Dictionary
The declaration format for list-type dictionaries is #DICT(S)_LIST(S) <variable name>
If the declared primary key type is integer, it supports using the ERD keyword functionality.
When declaring this variable, it supports simultaneous definition with the GLOBAL, SAVEDATA, CHARADATA, DYNAMIC, REF, and HARDCHECK keywords.
When defined with the SAVEDATA keyword, the バイナリデータライターのバージョン (binary archive writer version) configuration item needs to be changed to 1809 or above.
Please refer to the List Related and Dictionary Collection Related commands to learn more about functionality.
#DICTS_LIST MY_DICTLIST			; Declare a list-type dictionary variable with primary key type `string`, value type `integer`, and name `MY_DICTLIST`

DICTITEMCREATE MY_DICTLIST, "NEW"	; Create a list named "NEW" in MY_DICTLIST
LISTADD MY_DICTLIST:"NEW", 20		; Add an element with value 20 to the "NEW" list in MY_DICTLIST
PRINTVL MY_DICTLIST:"NEW":0		; Print the 0th element of the "NEW" list in MY_DICTLIST, printing result is "20"
Hash List-type Dictionary
The declaration format for hash list-type dictionaries is #DICT(S)_HASHLIST(S) <variable name>
If the declared primary key type is integer, it supports using the ERD keyword functionality.
When declaring this variable, it supports simultaneous definition with the GLOBAL, SAVEDATA, CHARADATA, DYNAMIC, REF, and HARDCHECK keywords.
When defined with the SAVEDATA keyword, the バイナリデータライターのバージョン (binary archive writer version) configuration item needs to be changed to 1809 or above.
Please refer to the Hash List Related and Dictionary Collection Related commands to learn more about functionality.
#DICTS_HASHLIST MY_DICTHASHLIST			; Declare a hash list-type dictionary variable with primary key type `string`, value type `integer`, and name `MY_DICTHASHLIST`

DICTITEMCREATE MY_DICTHASHLIST, "NEW"		; Create a hash list named "NEW" in MY_DICTHASHLIST
HASHLISTADD MY_DICTHASHLIST:"NEW", 20		; Add an element with value 20 to the "NEW" hash list in MY_DICTHASHLIST
PRINTVL HASHLISTHAS(MY_DICTHASHLIST:"NEW", 20)	; Print the lookup result of the "NEW" hash list in MY_DICTHASHLIST for value 20, printing result is "1"
Dictionary-type Dictionary
The declaration format for dictionary-type dictionaries is #DICT(S)_DICT_<I|S><I|S> <variable name>
If the declared primary key type is integer, it supports using the ERD keyword functionality.
If the declared secondary key type is integer, it supports using the ERD keyword functionality.
When declaring this variable, it supports simultaneous definition with the GLOBAL, SAVEDATA, CHARADATA, DYNAMIC, REF, and HARDCHECK keywords.
When defined with the SAVEDATA keyword, the バイナリデータライターのバージョン (binary archive writer version) configuration item needs to be changed to 1809 or above.
Please refer to the Dictionary Related and Dictionary Collection Related commands to learn more about functionality.
#DICTS_DICT_IS MY_DICTDICT		; Declare a dictionary-type dictionary variable with primary key type `string`, secondary key type `integer`, value type `string`, and name `MY_DICTDICT`

DICTITEMCREATE MY_DICTDICT, "NEW"	; Create a dictionary named "NEW" in MY_DICTDICT
MY_DICTDICT:"NEW":8 '= "TEXT"		; Write an element with key 8 and value "TEXT" to the "NEW" dictionary in MY_DICTDICT
PRINTSL MY_DICTDICT:"NEW":8		; Print the element with key 8 in the "NEW" dictionary in MY_DICTDICT, printing result is "TEXT"
Syntax, Command, and Program Compatibility Changes
Removed restrictions on function-type macro definition related functionality. The reliability of this feature has not been fully tested.
Related changes to ERD keyword functionality:
- When omitting keyword index values, the system will automatically assign an unused index value to that keyword.
Warning: Variables declared withSAVEDATAare not recommended to omit index values to avoid game save data corruption. - When filling in an existing keyword name as an index value, it will directly reference that keyword's index value.
1,能量饮料	; The index value for "能量饮料" is assigned as 1
,酒		; The index value for "酒" is automatically assigned as 0 because index value 0 is not occupied
酒,Wine		; The index value for "Wine" will reference from "酒", which is 0
果汁,ジュース	; The index value for "ジュース" will reference from the subsequent "果汁", which is 2
,果汁		; The index value for "果汁" is automatically assigned as 2 because index values 0 and 1 are already occupied
Related changes to FORM syntax:
- When using interpolated variables, it is no longer necessary to distinguish between curly braces (
{STR}) and percentage signs (%STR%) based on their variable type. - Added alignment keyword
CENTER, which can center-align text within a specified character length. For example,{"确�认", 6, CENTER}will be formatted as" 确认 ". - Numerical expressions can be passed as alignment parameters, for example
{"确认", 6, 1 + 1}will be formatted as" 确认 ".
Specific numerical values and their meanings are as follows:- 0 = Left alignment, equivalent to the
LEFTkeyword. - 1 = Right alignment, equivalent to the
RIGHTkeyword. - 2 = Center alignment, equivalent to the
CENTERkeyword.
- 0 = Left alignment, equivalent to the
Related changes to HTML syntax:
- The
bcolorattribute of thedivtag has been renamed tobdcolor(borderColor) to avoid confusion with thebcolor(backgroundColor) attribute in other tags. - The input value format for the
bdcolorattribute of thedivtag has been changed to'color'single color value, no longer accepting four-corner color values. - The input value format for the
borderattribute of thedivtag has been changed to'thick'single numerical value, no longer accepting four-corner numerical values. - The effect of the
marginattribute of thedivtag has been changed to expand outward, no longer squeezing inward.
Character-type two-dimensional arrays support omitting the first parameter (when the キャラクタ変数の引数を補完しない (do not automatically complete character variable parameters) configuration item is not enabled).
The temporary cache of FOR-NEXT and REPEAT-REND control statements will enter and exit the stack along with the function.
The backslashes \\ in the file path obtained by the __FILE__ variable have been replaced with forward slashes /.
One of the parameter formats of the REPLACE command has been separated into an independent command REPLACEBYARRAY.
The following commands now support processing Emoji characters 🎉. These commands will calculate approximate character length by calculating display width when processing Emoji characters.
For example, the character length of 😀 is 2, and the character length of 👨👩👧👦 is 4.
The logic for handling edge characters in the SUBSTRING command has been changed. If the selected position in the text is in the middle of a long character, it will retreat to the starting position of that character.
That is, characters stuck at the starting position will be included, while characters stuck at the ending position will be ignored.
When ERDNAME omits the third parameter, it will search for the subscript keyword of the last dimension of the array.
The INPUTMOUSEKEY command will additionally change the values of RESULTS:0 and RESULT:3.
The GCREATE, GCREATEFROMFILE, and GLOAD commands will release already created images before creating new ones, meaning there is no need to call the GDISPOSE command before creation.
The second parameter of the GCREATEFROMFILE command must ensure it is a relative path starting from the main directory, and the third parameter has been removed.
The line cap effect of the GDASHSTYLE command has been changed.
The GDRAWTEXT command only returns RESULT:0; other return values are no longer valid.
The drawing result of GDRAWGWITHMASK is affected by alpha value and blue value.
Due to the graphics library replacement, the usage of the color matrix in the GDRAWG and GDRAWSPRITE commands has changed. For details, please refer to the instructions in the GSETCOLORMATRIX command.
The SETANIMETIMER command will continue to refresh animations even during timed waits like TINPUT or INPUTMOUSEKEY.
The SPRITECREATE and SPRITEANIMECREATE commands will release already created non-built-in Sprites before creating new ones, meaning there is no need to call the SPRITEDISPOSE command before creation. If a built-in Sprite with the same name already exists, creation will fail.
The SPRITEDISPOSEALL command no longer has the ability to remove built-in Sprites, but it can release all images referenced by built-in Sprites.
The first parameter of the PLAYBGM and PLAYSOUND commands only supports inputting Audio names. To play via audio file paths, please first use the AUDIOCREATEFROMFILE command to create Audio.
For information on how to add built-in Audio resources, please refer to the Audio Functionality section.
The SETBGMVOLUME command will only change the volume of the currently playing background music, no longer affecting the global volume.
The SETSOUNDVOLUME command has been deprecated and no longer has any effect.
The backslashes \\ in the file path obtained by the ENUMFILES command have been replaced with forward slashes /.
When returning to the title screen through the タイトルに戻る button in the menu bar, the following content will be additionally cleared:
- Clear all CBG images, including CBGBUTTON, CBGBMAP, etc., with the same effect as the
CBGCLEARcommand. - Clear all Sprites created at runtime, release all images referenced by Sprites, with the same effect as the
SPRITEDISPOSEALLcommand. - Clear all Spine animations created at runtime, release all images referenced by Spine animations, with the same effect as the
SPINEDISPOSEALLcommand. - Clear all Audio created at runtime and release audio cache, with the same effect as the
AUDIODISPOSEALLcommand.
The emuera.log game log and console.log debug log are saved using UTF-8-BOM encoding.
The watchlist.csv variable watch list is saved and read using UTF-8-BOM encoding.
Closing the debug window no longer automatically saves the variable watch list.